Tuesday, September 28, 2010

Gamin Nuvi 265W review

I used to have a Garmin Nuvi 255w, but it was stolen out of my truck while I was down in the U.S. last month. I recently picked up a Garmin Nuvi 265W to replace it with.
I've been using it for about 2 weeks now. I travel fairly often for work, so I've given it a bit more of a work out then the average person might in just a couple of weeks. Garmin has obviously been listening to its users, as they have made small changes that make a big difference from the 255 to the 265. I never liked how my old GPS wouldn't show your current speed when you had a destination programmed in. The "next turn" window took the place of the speedometer. Now, the "next turn" window has been moved to the top, and your speed and arrival time stay in their regular places at the bottom.

The routes seem to be as effective as before, giving you the options of the "fastest" route, the "shortest" route, or as a new option, the best "fuel efficient" route. Using the fuel efficiency part of routing takes a bit of setup that I haven't bothered with yet, as I care more about getting to my destination quickly as opposed to saving fuel along the way, but you've got to appreciate the option in this day and age.

The voice directions are pretty much the same as before. The speaker is loud, the voices speak clearly, and the pronunciations are pretty much spot on.

As in most other GPS units, the 265W comes preloaded with tonnes of POI's (points of interest) including fuel, food, shopping and more.

Something my old unit didn't have, but is included in the 265W is bluetooth. This allows you to hook up your GPS to your cell phone and make hands free calls while driving. I prefer this method to having a small earpiece, however, there are some issues with this. Although the speaker seems loud when listening to directions, calls are a little more difficult to hear. You have to have the volume cranked up to 100%, the windows closed and the radio off. Some people seem to hear me speaking alright, but many say that I'm too quiet and have trouble making out what I'm saying. Also, many people seem to have trouble getting their phonebooks to sync to the GPS. I have trouble getting my Palm Pre to sync the phonebook at all. Sometimes it shows up, sometimes it doesn't, and I haven't been able to figure out why yet. Regardless of this, you can still make calls, even if you need to dial from your phone to initiate it. Lastly, sometimes the voice directions get on my nerves and I mute the voice. I discovered that if you mute the voice, you also mute the speakerphone. Garmin should have set up two separate voice volume controls, one for the GPS and one for the speakerphone.

Another feature new to me on this unit is the FM Traffic receiver. It comes as part of the power cord, and a lifetime membership is included with the purchase of the unit. It doesn't work everywhere, usually only near larger cities. I drive around Toronto fairly often, so it has been picking up traffic for me in that area. It seems pretty good at knowing when I'm coming across traffic at regular high volume times, but doesn't seem to be quick to react to accidents. I left my destination from Toronto, and it warned me I had traffic in my route, and chose a different path. Once through there, traffic picked up fine. However, a few minutes later, I hit another traffic jam, and this was a doozy! Unfortunately, the whole 2 hours I sat on the 401, crawling forward inch my inch, the GPS happily claimed my route was clear and no traffic issues on my route. So you take it for what you can. It will sometimes predict traffic problems correctly, but last minute construction and or accidents may still leave you cursing in gridlocked parking lots.

Overall, I'm happy with my purchase of the Garmin Nuvi 265W. It helps me get from point A to point B quickly and without getting lost. It helps me make hands free calls while I'm getting there (because hand held devices while driving are illegal in Ontario), while doing its best to get me around any traffic jams I encounter along the way. Compared to other units on the market, the price was very fair, at $159 from Costco. I'd recommend this unit to anyone currently shopping for a GPS.
Tuesday, September 14, 2010

2 Simple Tips To Keep Your Computer Running Smoothly

I often get people asking me to come over and fix their computer because "it's running really slow". I find that the majority of the time, it is simply one (or both) of the following 2 things that are causing their computer lag.

1 - Clear up that hard drive!

Windows needs space on your hard drive to work well. It's always moving things around, loading files in and out, creating temporary files to work with etc. In order to do this, it needs free space on your hard drive. Take that huge mp3 collection (bought and paid for from iTunes, of course!), large photo folders, video folders, and anything else that tends to take up lots of space and move them elsewhere. Check under My Computer. The "C" drive will be your main hard drive. Many times, your computer will come with a partition already set up. If there are any other drives listed under the "Hard Drive" section, then it is likely a partition (or even a completely separate hard drive). Simply click and drag the folders containing all your large storage folders over to your second drive. If you don't have a partitioned drive (or a second hard drive), you can burn your files to a CD/DVD, or there are even online storage sites that will keep your stuff "in the cloud" for you. However, most of the sites don't offer a great deal of space for free. Up to 2 gig seems to be about the standard. External usb hard drives are another option. They have gotten a lot cheaper in the last year. It should be fairly easy to find a 1 terabyte (1000 gigabytes) of storage for under $100. Future Shop, Staples, Best Buy or your other favorite tech store will have one. However you choose to store your files, you should be aiming to keep at least 20% of your "C" drive free.

2 - Clean out that spam and spyware!

No matter how "careful" you think your internet habits are, you are going to pick up spam bots and spyware. The two programs I choose to use currently, both of which are free, are SuperAntiSpyware and MalwareBytes. SuperAntiSpyware runs in the background. MalwareBytes does not, and needs to be run manually when you want to do a sweep. Keep both up to date, run scans with both of them once a week, and your computer will stay clean and speedy.

As simple as it sounds, these two steps make up a good portion of the calls I get for slow and laggy computers. Keep on top of these two things, and your computer will likely stay quick and speedy. At least, until its a month old, in which case it will be horribly out of date and due to be replaced! The joys of the technology age...

Monday, September 13, 2010

Tethering my Palm Pre - An Exercise in Frustration

UPDATE NOV 9/10: Just thought I should add a note in here. The My Tether forums haven't heard anything from the creator in a long time, and have just become a large forum of spam. I would not recommend donating for this program, as I have no idea if you'll actually get access to the program. If you are still interested in getting a copy of My Tether, shoot me an email. Please see my more up to date post here.

We have a cottage in a park up in Grand Bend that we frequent in the summertime. For the last few years, we've been able to pick up an unprotected wifi signal from someone nearby, which we used on our laptop to check email, facebook etc. Unfortunately, this summer, the signal was gone and we were stuck up at the trailer with no internet access. I could do some stuff on my Palm Pre, but it is still no substitute for a laptop. This led me to researching "tethering" for my laptop and Pre.

Tethering is where you hook your cell phone up to your computer and use the 3G signal to gain internet access. Whether Bell allows this or not seems to be a grey area, from what I've read on multiple forums, but as of yet, no one claims to have been charged extra for doing it, so I decided to give it a try.

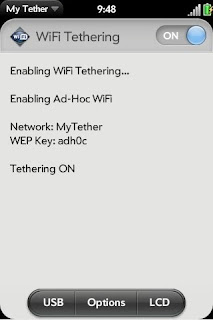
It didn't take long to discover the main way people are accomplishing this task is use a program called My Tether. They have a free edition, and a $10 donation edition. The paid version is simple to install, no different from a regular program or app. The free edition takes a bit of hacking to get installed. I decided to try the free edition, seeing as I'm cheap, and I felt capable of handling the work involved.

First Step: Bluetooth Connection

Now, although I said that My Tether is most common way to tether your Pre and computer, I did find some posts that state that since webOS 1.3.5.2 bluetooth tethering on the Pre has been enabled. I have an old bluetooth dongle, so I tried this method first. I didn't get very far, as no matter what I tried to do, my laptop and Pre would not sync. I suspect this had more to do with my old crappy bluetooth dongle than anything. After a couple hours of messing around with it, I gave up. On to the next step!

Step 2: Install My Tether


I got the instruction on how to install the free version of My Tether from this website.
I had no trouble getting through the rooting part, and installing My Tether on to my Pre. However, once I got rebooted and fired up the program, it simply wouldn't work. No matter what I did, the AoNet wifi server would not show up on my laptop. I triple checked all the steps, but could find nothing I had done wrong. Well, there's more than one way to skin a cat (so to speak). On to step 3!

Step 3: USB tethering

Wifi isn't the only way to connect with My Tether. You can also use it to connect via usb. In fact, forum posts on the My Tether website state that the usb connection is more stable and faster than the wifi.

Marco Picard posted this list of instructions on the My Tether forums. I went through MANY diffferent lists of instructions before I found this list, and it is what worked for me. Some of his steps varied quite a bit from what I had to do, so I've redone this list myself, but wanted to give Marco credit, since his list was the one that was closest to what I needed to do.

1. In My Tether on your Pre, turn on USBNet.

2. Reboot your Pre, open My Tether again and turn on DHCP. Make sure USBNet is still on.

3. Plug your in Pre to a USB slot on your computer.

4. If a wizard opens up, just close it. For me, no wizard started. My Pre connected normally. Choose "Just Charge".
5. Open up your Device Manager.

6. There should either be a "USB Ethernet Gadget" as Marco suggests, or "RNDIS Ethernet Gadget" as it came up on mine. Right click on it and select "update driver"
.
7. In the window that opens up, choose "Browse my computer for driver software"

8. On the next page, choose "Let me pick from a list of device drivers on my computer"

9. On the next page, choose "Network Adapter"

10. Under "Manufacturer", click "Microsoft Corporation". (Note: this is not the same as "Microsoft")

11. Choose "Remote NDIS based Internet Sharing Device.

12. Click Next. It will install the new driver.
 
That should be it. Once I went back to the Network Center, after about 30 seconds, it showed "Local Connection 2" to be connected to the internet! Success!
 
This a pretty complicated process, and from what I've seen, can have many different issues come up along the way. By all means, if you come across something other than what I've posted above, send me an email or leave a comment and I'll help you out as best I can. You could also try the My Tether Forums.
If I ever manage to find out why the wifi didn't work, and how to fix it, I'll update this post.
Good luck!

Saturday, September 11, 2010

Google Call Phone

There is a new feature for those of you who use Gmail. Free calls to anywhere in Canada and the US! Its simply called Call Phone, and is available in the lower left side of your gmail window.


Clicking on the link opens up a small, standard phone dialing window.


You simply dial any number for Canada or the US, and the call is placed, free of charge! It works nice and easy for me, because I already have a mic built into my laptap, but if you don't, you'll need a microphone to use with this. It seems to work fine using my laptops speakers, because of an anti echo option available.
Calling someone through Call Phone results in the number 760-705-8888 coming on their call display.
Call quality was fine for me. Voices sound a little echoy coming through my laptop speakers, but that could just be the speakers themselves, and I had no problem making out what people were saying.

Now, you may be wondering "In this day and age, when pretty much everyone has a cell phone, what use is there in a calling option like this?" Well, there are couple of instances when something like Gmail Call Phone would still be handy. If you were in a situation with poor cell phone reception, but still had internet access, calls could be placed with no issues. I was in this situation myself not too long ago. Also, the fact that you can place calls for free to anywhere in Canada and the US, you could save yourself a tonne of money in long distance charges. Unfortunately, in a blog posting I found by Robin Schriebman, in this blog posting, calls are only going to be free untill the end of the year or so. However, until they start charging for the calls, this is a great feature to be aware of, and useful many different situations.


Wednesday, September 8, 2010

How To Get Your Xbox To Play All Your Media Files


I use my Xbox 360 as a media streaming device for my TV. I download videos to my computer, and stream them through the Xbox to my big screen TV. Up until recently, I had simply used Windows Media Player to stream my videos. For the most part it worked ok, but sometimes I would come across a file that wouldn't play properly, or not at all. Sometimes the video would be really choppy, sometimes the sound would get out of sync, or sometimes the videos would just not show up on the playlists at all. Now, I've found TVersity.

TVersity


TVersity is designed specifically to stream content. It has a free version that works just fine for standard streaming. You can download it here. I installed the free version, but they also have a PRO version that adds the ablility to watch internet content on your tv, as well as allowing streaming to IPods/IPads etc.
Once TVersity has installed, just click the big plus sign in the upper left, and browse to the folder containing your videos. Then click the TV icon next to the plus sign, choose "start sharing service" and you're all set! I've been using TVersity for a week or so now. Videos that were not showing up on my playlist now show up and play fine. I also can play some older videos that would only play in choppy bits or would not stay in sync with the audio. Thanks to TVersity, streaming videos to my TV has never been easier!

Tuesday, September 7, 2010

How To Fix A Disabled Ipod Touch

Someone brought me an iPod Touch recently. It was locked on a screen that said his iPod was disabled, and to try again in 26 million minutes. That seems like a rather long time to wait for a reset. After some internet research, I figured out how to restore it.


Unlock Your Disabled iPod

Step 1 Close iTunes, and turn your iPod off.

Step 2 Turn on your iPod while holding both the Sleep button on top and the home button.

Step 3 Hold both buttons down until either:
  1. The first time I did this, it took about 30 seconds for anything to come up on the iPod screen. Once the apple comes up on the iPod, release the sleep button while continuing to hold the home button.
  2. The second time I did this, the apple screen came up as soon as I pushed both buttons. If I released the sleep button now, it wouldn't work. I had to hold both buttons through the first apple screen. After about 5 seconds or so, the apple screen disappeared. I held both buttons through this part. When the apple screen returned after 15-20 seconds,  I released the sleep button and held the home key. 
Either way, it might take you a few tries to get it. Just keep trying until the next step happens

Step 4 iTunes should open up and say that it has detected an iPod in recovery mode and that it must be restored. I was still holding the home button up to this point. Its fine to let go now. iTunes should be up at the iPod default screen with everything greyed out except for the restore button. Click the restore button.

The first time I tried to restore the iPod, iTunes said it had to download the default settings. It took so long that the iPod reset itself and went back to the disabled screen. The iTunes download continued on, so I left it. Once the download was done, I restarted the iPod again (right back to step 1), and it came up to the restore window. Clicking restore caused the iPod to start loading in the default settings.

There we go! A freshly restored iPod.

Jason Barr from The Dean Blundell Show

UPDATE JAN 25 2011 : For those of you still coming across this posting, Jason Barr has recently joined Chris Biggs on the 97.7 HTZ-FM morning show. I have yet to catch the show, but I will make a point of listening and posting on what I think of the show.


Update Jan 29 2011 : I've caught the show a couple of times now. I usually switch off the Dean Blondell show when they get going on the Meatus spelling bee. I hate that part, so I've been switching to 97.7. It's good to hear Jason on the radio again, and so far, their show has been pretty funny. If  you haven't listened to it yet, I recommend you give it a listen!

I listened to the guys on my way in to work this morning. Although they are still saying they can't comment on what happened, I heard that if you email them, they will tell you what happened. I'll send an email shortly and see what they say.

ADDED 9:38pm. Got a response from Dean already! He says that they still can't comment, but that they will be able to comment soon. Oh well. We just have to be patient I guess.

UPDATE OCT 4, 2010: This posting seems to be getting a lot of hits, so I just wanted to update it for everyone checking it out. Although the guys had said they would talk about what happened with Jason Barr in a little while, not a peep has been heard about it from anyone. I've scoured the internet, and can find no news whatsoever. It looks like unless Jason himself makes a posting or something, we're not going to get to find out what exactly happened to him. I miss him on the show, and wish the best of luck to him in whatever path he decides to pursue next.


Palm Pre Review

This will be my first tech blog posting. They say, "write what you know!", and so I've decided to start with a review on my Palm Pre.

First Impressions


I've had my Palm Pre for about a year now. I paid $200 dollars, signing up for a 3 year contract with Bell.
At first, I was pretty excited about my new Pre. The webOS system, although having a slight learning curve due to gestures/swiping, was fun and easy to learn. True Multi-tasking with their card system was something I had never seen before on a cell phone. Bouncing back and forth between messaging, webpages and apps without having to close one to open the other was fantastic!
After a few months had passed, I started to realize that the Palm app catalogue was sorely lagging behind its competitors. Many of the apps I saw advertised on TV and on web pages were only available for iOS or Android. As an avid World of Warcraft fan, I was disappointed to learn that many of the WoW specific apps available were only for iOS and Android. More and more apps have been added in the last few months, and although we are still lagging behind, things are improving and I expect to find better and more popular apps available as Palm moves forward. This lack of app coverage has been disappointing so far, though. I was getting tired of my Pre and was beginning to look around for alternatives.

Preware To The Rescue!


Recently, I came across a post on engadget that was about overclocking your Palm Pre processor. After a fair amount of research on the matter, I decided to give it a go. I had been finding my Pre sluggish as of late, so the thought of speeding it up was intriguing. After completing the process of putting my Pre in developer mode and installing Preware, new life was breathed into my Pre! Running the CPU at 1 ghz instead of Palm's standard 500 mhz made my phone sing! Windows open incredibly fast, apps load almost instantly. Even Google Maps loads quicker, and the screen redraw is near instant.


Of course, you have to trade battery life for speed in this situation, but in order to make this bearable, you are able to set the overclocking to only take effect when the screen is on. When the screen is off, it reverts back to its standard 500 mhz. This has made it so that the extra battery drain is not that noticeable, and definitely worth the added performance.
As well as overclocking, Preware gives you the ability to change many settings on the Pre that are not normally available. From small things like adding the date to the info bar at the top, to bigger things like a virtual on screen keyboard. The list of options is truly impressive. If you want to breathe new life into your Palm Pre, then Preware is the way to do it.

My Palm Is Here To Stay

Thanks mostly to Preware, my Palm Pre is now fast, adaptable and more fun!